e-Paper displays are a really neat way to display information and their price makes them affordable to experiment with. This post details how to create a display/status board that shows various pieces of information on an e-Paper display mounted in a frame, driven by a Raspberry Pi Zero W controller. The result is a nice little display that can pull information from various sources (weather, stocks, etc.) and display it front and center for you to keep track of.
Description
This tutorial is an opinionated way to create an e-Paper display to display specific types of information. More directly, it will utilize these scripts created for this tutorial and will display/assumes the creator has the following components:
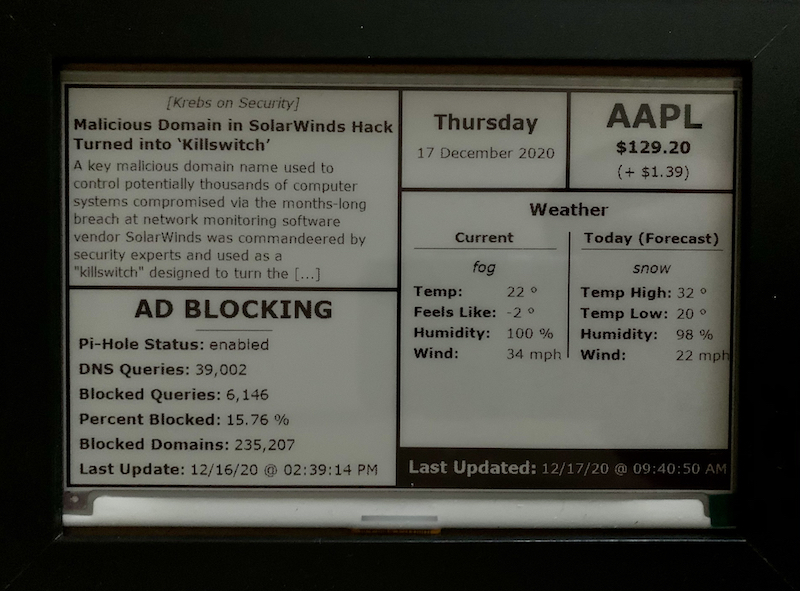
- Last Updated: Date and time of last e-Paper display update
- Weather: Current and Forecasted (today’s weather) for the configured location, including temp, humidity, wind, high/low, etc.
- Day/Date: Current day of the week and date
- Stock: Current/real-time (as real as the configured screen refresh) stock information about 1 stock
- RSS Top Article: The top/newest article in a configured RSS source, including heading and summary
- Pi-hole Ad Blocking: Statistics about a configured Pi-hole ad-blocking instance reachable by this device
A screen shot as an example of the resulting display:
Hardware
This tutorial assumes you have the following:
- Raspberry Pi Zero: Other variants of Rasberry Pi may likely work
- MicroSD Card: For Raspberry Pi OS
- e-Paper Display: This tutorial will use a 7.5” Waveshare model
- e-Paper Driver Board: The Waveshare model linked above comes with a Raspberry Pi Zero HAT
- 5x7 Picture Frame: Optional, but makes for a clean mounting solution
Note that there is no circuit diagram here because the connectivity is not complicated - it’s simply power provided to the Raspberry Pi device, and the e-Paper HAT attached on top of the GPIO pins of the Raspberry Pi.
Headless Zero
The Raspberry Pi Zero comes without display outputs (not entirely true, but creating one is more difficult than it’s worth). As such, we’ll first provision the MicroSD card to enable headless operation and remote SSH connectivity over your wireless network. Using the Raspberry Pi Imager, provision Raspberry Pi OS Minimal version (desktop components will not be needed).
Once the MicroSD card has been provisioned with the Raspberry Pi OS, re-insert/re-mount it and create the wpa_supplicant.conf file which will be used
to tell the Raspberry Pi OS how to connect to your WiFi. Note, this example is performed on a Mac OS via a terminal, but any method of creating a file
on the card will suffice so long as it’s not using a text editor that injects special characters/line breaks that will make the file unreadable to the OS:
# assuming your MicroSD was provisioned as "boot"
$ cd /Volumes/boot/
$ vim wpa_supplicant.conf
# ensure has the following, replacing configurations with
# your specific variables:
Finally, the Raspberry Pi OS disables SSH services by default - in order to enable the services (which is what we’ll use to connect to the device), create a blank file in the root directory of the MicroSD card. This will tell the OS to start/enable the SSH service on boot:
$ touch /Volumes/boot/ssh
Once the above have been completed, connect your e-Paper driver HAT and boot your Rapsberry Pi - wait approximately 5 minutes, and you should then
be able to SSH to the device by using the local domain (or determine its IP address via whatever systems-administration skill set you’re comfortable
with). The default login is username pi and password raspberry (definitely change the password on first login): ssh pi@raspberrypi.local.
Software
The software for the e-Paper display (specific implementation) is already completed and in GitHub - we’ll next clone the source, configure, and kick off the scripts! As a note - yes the scripts are somewhat messy (haven’t had the time to go back and DRY them up/apply better practices as noted in the “improvements” section), but they work.
After logging into the Raspberry Pi Zero W device as the pi user, install git (if not yet installed) and clone the repository. Then, change to the
directory where the scripts reside for this particular device:
$ sudo apt-get -y install git
$ git clone https://github.com/jekhokie/electronicsbox
$ cd electronicsbox/
A lot of the instructions on what to do next are contained in the repository README.md file, but we’ll detail them more specifically here. One of
the things required by the e-Paper display to function is the enablement of the SPI interface on the Raspberry Pi board. To do this, use the
raspi-config command:
$ sudo raspi-config
# In the menu, navigate and select:
#    Interfacing Options -> SPI -> Yes
# then reboot:
$ sudo reboot
Once the SPI interface has been enabled, we can get to work configuring the prerequisites and software
# install some required prerequisites
$ sudo apt-get -y install libatlas-base-dev \
                          libopenjp2-7 \
                          libtiff5 \
                          python3 \
                          python3-lxml \
                          python3-pip \
                          ttf-mscorefonts-installer \
                          wiringpi

# install e-paper hardware-based requirements
$ cd ~
$ wget http://www.airspayce.com/mikem/bcm2835/bcm2835-1.60.tar.gz
$ tar zxvf bcm2835-1.60.tar.gz
$ cd bcm2835-1.60/
$ sudo ./configure
$ sudo make
$ sudo make check
$ sudo make install

$ cd ~
$ wget https://project-downloads.drogon.net/wiringpi-latest.deb
$ sudo dpkg -i wiringpi-latest.deb
$ gpio -v

# install virtualenv for our Python environment
$ pip3 install virtualenv

# ensure we're in the project directory and create a virtual
# environment for python to operate out of/enable the environment
$ cd ~/electronicsbox/raspi3--e-paper-display/
$ python3 -m virtualenv .env
$ . .env/bin/activate

# install python dependencies
$ pip install -r requirements.txt

# configure your environment and lock down sensitive info
$ cp config/settings.yml.sample config/settings.yml
$ vim config/settings.yml
# edit the configurations for your needs/environment
$ chmod 600 config/settings.yml
Usage
Once you’ve set up your environment configurations and installed all dependencies, you can then launch the script to have the screen updated with the various details from your data sources:
$ cd ~/electronicsbox/raspi3--e-paper-display/
$ . .env/bin/activate
$ python main.py
If all goes well, in a minute or two, your screen should update with all the juicy information from the data sources configured - congratulations!
True Headless/IoT
One improvement over running things manually is to have the device only depend on power to function (e.g. automatically launch the display functionality
when power is applied to the Raspberry Pi device). To do this, simply update the /etc/rc.local file to tell the post-boot functionality to launch
the script once the user level has completed its boot sequence:
$ sudo vim /etc/rc.local
# add the following to the file before `exit 0`:
#   ...
#   . /home/pi/electronicsbox/raspi3--e-paper-display/.env/bin/activate
#   python3 /home/pi/electronicsbox/raspi3--e-paper-display/main.py
#   exit 0
Once you’ve edited the above file, you can safely log out and shut down the Pi - future boots of the Pi device will then result in automatic launch of the e-Paper display functionality without any manual intervention, making it feel much more like a standalone device.
Credit
The above tutorial was pieced together with some information from the following sites/resources, among others that were likely missed in this list: